
Post content has been hidden

To unblock this content, please click here

Jessica
VIP October 2019

diy Aisle Runner Rose Petal Border - Stage 1 complete

Jessica, on August 20, 2019 at 9:08 PM Posted in Do It Yourself 5 21
Found this idea on pinterest today.

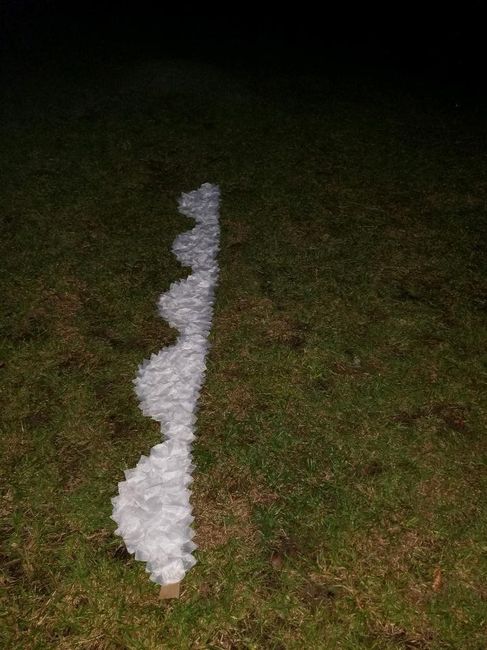
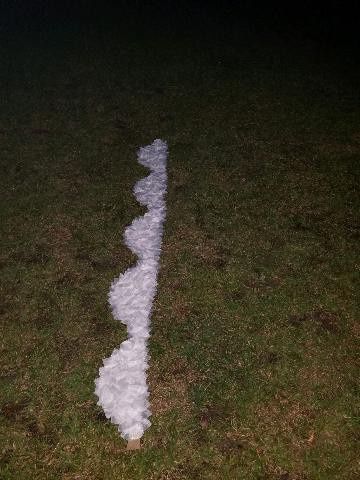
Ive been racking my brain trying to figure out the aisle decor for the past 6 weeks or so. Had a few trials that I just didn't like.

I already have a burlap aisle runner, so never thought of adding rose petals along the edges.

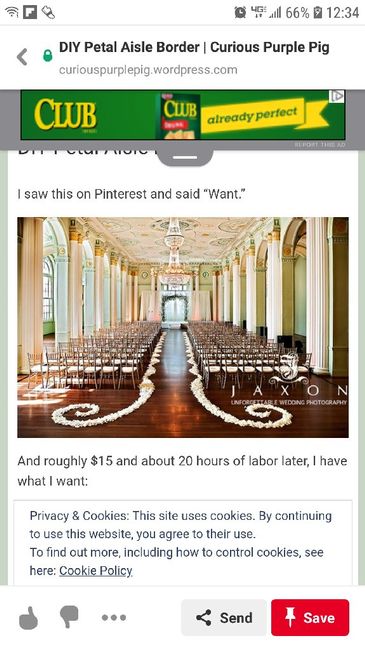
Then I found this other brides DIY and was in love (Hers is the 3rd pic).

It took about an hour (with help from 1) to do this 7.5' section. It was really easy and I am shocked at how well it turned out.

Planning to add the little swirly pieces to the ends as well.

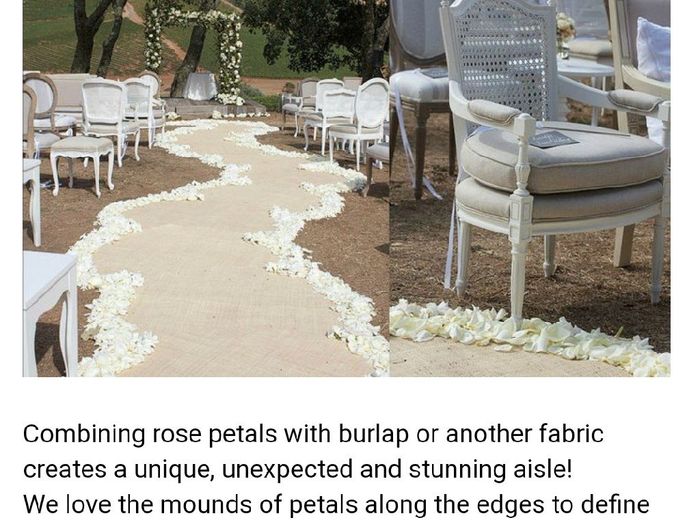
Planning for mine to be a mix of the last 2 pictures when its done!

Will update later when more progress has been made.

diy Aisle Runner Rose Petal Border - Stage 1 complete 1

diy Aisle Runner Rose Petal Border - Stage 1 complete 2

diy Aisle Runner Rose Petal Border - Stage 1 complete 3

diy Aisle Runner Rose Petal Border - Stage 1 complete 4

21 Comments

Latest activity by Jessica, on August 21, 2019 at 8:13 AM
  • Yam
    VIP September 2019
    Yam ·
    • Flag
    • Hide content
    Oh my god that’s so pretty!!! I really want to do something like this now!
    • Reply
  • Kelly
    Super October 2019
    Kelly ·
    • Flag
    • Hide content
    You are amazing with the diy projects. Simply killing it!
    • Reply
  • Cher Horowitz
    Master December 2019
    Cher Horowitz ·
    • Flag
    • Hide content

    This looks really pretty! I can't wait to see the finished product!

    • Reply
  • Jessica
    VIP October 2019
    Jessica ·
    • Flag
    • Hide content
    View Quoted Comment
    The girl who made the one "i copied" said it took her over 25 hrs total. Idk why. She must have been perfecting each individual petal or something idk but I did a small sample of "organized" petals vs "tossed" petals and they looked much better.

    Best thing? It should cost under $15 total. I spent $9 today. Everything came from dollar tree though. You should try it, esspecially if you can get some help.

    My "help" was my less than enthusiastic 11 year old son lol
    • Reply
  • Sexypoodle
    Master October 2021
    Sexypoodle ·
    • Flag
    • Hide content
    Interesting… So are those small pieces of cut ribbon? How long is your aisle runner?
    • Reply
  • Jessica
    VIP October 2019
    Jessica ·
    • Flag
    • Hide content
    View Quoted Comment
    Awwww well thank you Kelly! Ive always loved doing crafty stuff anyhow so the wedding has given me a reason to do them.
    • Reply
  • Jessica
    VIP October 2019
    Jessica ·
    • Flag
    • Hide content
    View Quoted Comment
    Thank you! Me too!
    • Reply
  • Jessica
    VIP October 2019
    Jessica ·
    • Flag
    • Hide content
    View Quoted Comment
    My aisle runner is 30 ft. And no, not cut ribbon, just cheap flower petals from dollar tree. The exact same kind used in the other brides. I actually have used the same products as she did so far.
    • Reply
  • Lana
    Dedicated October 2019
    Lana ·
    • Flag
    • Hide content
    Can’t wait to see the finish project.
    • Reply
  • Yam
    VIP September 2019
    Yam ·
    • Flag
    • Hide content
    View Quoted Comment
    That’s really adorable! I’m sure my FH will have as much enthusiasm as your son lol
    I actually have flower petals to use from a failed petal curtain project, this sounds a lot easier than pricking my fingers with a needle constantly. I like your version, I’d want mine to look more like tossed petals too.
    • Reply
  • SraDeCarrillo
    Super August 2019
    SraDeCarrillo ·
    • Flag
    • Hide content

    Did you glue the petals to burlap strips?

    • Reply
  • Jessica
    VIP October 2019
    Jessica ·
    • Flag
    • Hide content
    View Quoted Comment
    No maam I bought a roll of brown kraft paper (also from dollar tree) and cut it into the shape I wanted (theres lots of ideas for shapes on pinterest, who knew?) Then just hot glued petals to the edges and after all edges were done we just layered the petals until no brown paper was showing.
    • Reply
  • Nikkeisha
    Devoted February 2020
    Nikkeisha ·
    • Flag
    • Hide content

    That's really pretty!

    • Reply
  • Jessica
    VIP October 2019
    Jessica ·
    • Flag
    • Hide content
    View Quoted Comment
    Thank you! I can't wait to finish it now!
    • Reply
  • H
    Super September 2019
    H ·
    • Flag
    • Hide content
    That is such a unique and really cool idea! I can't wait to see how it looks in the end! I wonder what exactly took her so long though, seems so simple yet really pretty!
    • Reply
  • Jessica
    VIP October 2019
    Jessica ·
    • Flag
    • Hide content
    View Quoted Comment
    Thank you! I think she was just arranging them too much. Initially I started doing the same thing then had to check myself lol!

    And im glad you said that because compile but pretty is exactly what I was going for!
    • Reply
  • SraDeCarrillo
    Super August 2019
    SraDeCarrillo ·
    • Flag
    • Hide content
    View Quoted Comment

    Wow! So cost effective and beautiful.

    • Reply
  • Andrea
    Savvy September 2019
    Andrea ·
    • Flag
    • Hide content
    That’s awesome!!
    • Reply
  • Amy
    Expert May 2022
    Amy ·
    • Flag
    • Hide content
    I've been trying to figure this out too for so long! This is the perfect solution because I didn't want to pull apart a ton of real roses but I also don't want fake petals just scattered all over the yard to clean up. Thank you.
    • Reply
  • Jessica
    VIP October 2019
    Jessica ·
    • Flag
    • Hide content
    View Quoted Comment
    Yep, that was our concern too, cleaning up fake petals. Super easy, inexpensive and truly pretty quick.
    • Reply

You voted for . Add a comment 👇

×

Related articles

WeddingWire celebrates love ...and so does everyone on our site! Learn more

Groups

WeddingWire article topics