






Post content has been hidden

To unblock this content, please click here

Gena
Savvy October 2019

Bridesmaid gifts

Gena, on June 23, 2019 at 6:16 PM

Posted in Do It Yourself 27

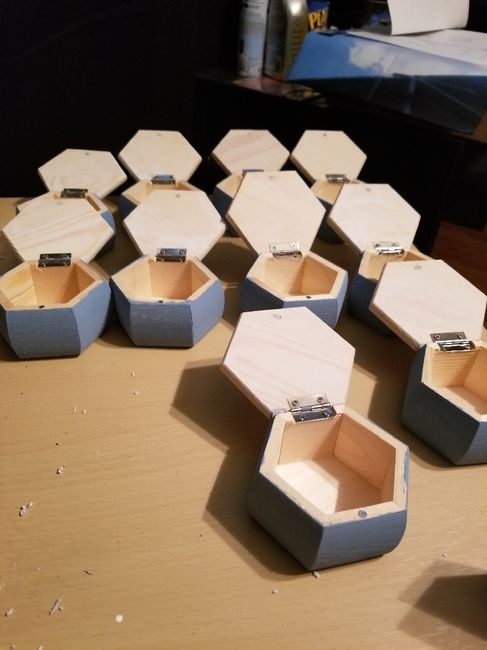
Ok so I have 10 bridesmaids. So gift options just narrowed down due to budget issues. I finally found some cute bracelets on wish but didnt really feel like it was speaking volumes of my gratitude. So I am making a DIY jewelry box and personalizing them with photos of us transferred to wood. If that...
Ok so I have 10 bridesmaids. So gift options just narrowed down due to budget issues. I finally found some cute bracelets on wish but didnt really feel like it was speaking volumes of my gratitude. So I am making a DIY jewelry box and personalizing them with photos of us transferred to wood. If that fails, I will just paint something on it. I bought the unfinished boxes for $3 at a craft store, painted them my wedding colors. Next steps the har part.... picture tranferring. Its easy but can go wrong just as easily. Overall, I managed to only soend $50 so far!


cfb_1225465.jpg

27 Comments

  • Tilar Fifield
    Devoted August 2019
    Tilar Fifield ·
    • Flag
    • Hide content
    OMG THEY ARE SO CUTE!! What a great idea! Totally stealing your idea (if I even have time to crank some more DYI out) 🤪
    • Reply
  • Gena
    Savvy October 2019
    Gena ·
    • Flag
    • Hide content
    View Quoted Comment
    Its easy! But it has to dry 12 hrs... i have better results at 24hrs. Need me to give ya instructions?
    • Reply
  • Tilar Fifield
    Devoted August 2019
    Tilar Fifield ·
    • Flag
    • Hide content
    View Quoted Comment
    Omg yeah that would be awesome! How did you transfer the photos? And what kind of paint did you use?
    • Reply
  • Naikesha
    Super September 2020
    Naikesha ·
    • Flag
    • Hide content
    Oh they look great and so personal I love this idea! You did a good job
    • Reply
  • Gena
    Savvy October 2019
    Gena ·
    • Flag
    • Hide content
    View Quoted Comment
    Things you will need:
    Mod podge (matte, satin, gloss. I used satin for a semi gloss)
    Paint brush
    Something flat like a ruler to get bubbles out (i bought a mod podge scraper)
    Wood surface. I have tested it on unfinished, painted and stained. Works great.
    Sealer (i used a wood deck sealed spray)
    Laser or jet ink print of your picture

    TO DO:
    Paint the colored side of picture with mod podge thick.
    Place face down on your wood surface.
    Use ruler or flat item to get rid of bubbles to make sure every part of the picture is on the wooden surface.
    Let dry a minimum 12 hrs. I had better results waiting 24 hrs.
    12 or 24hrs later, take a damp wash cloth and rub the paper in gentle (VERY GENTLE) circular motions until all the white paper is gone. This is the time consuming part but ya get to watch your art appear.
    Once free of all fuzzy white paper, let it dry and spray with sealer.

    Hint: practice a few times on some cheap chunks of wood before you try it on a permanent or expensive surface. There will be some scratches but it gives that rustic look!
    • Reply
  • Tilar Fifield
    Devoted August 2019
    Tilar Fifield ·
    • Flag
    • Hide content
    View Quoted Comment
    Screenshoting this! Thank you so much!!
    • Reply
  • Gena
    Savvy October 2019
    Gena ·
    • Flag
    • Hide content
    View Quoted Comment
    The paint, I used chalky paint for a antique look and then sealed it with wax to get the chalky look without the chalky texture. I used a white painters pen for the accents. And i used white antique stain for the lids before the picture but wasnt a fan of the white stain... barely could tell.

    Bridesmaid gifts 1
    • Reply

You voted for . Add a comment 👇

×
WeddingWire celebrates love ...and so does everyone on our site! Explore how we embrace diversity

Groups

WeddingWire article topics